Playwright AI Agents: How I Used Grok to Explore and Demystify Test Automation's Newest Feature
When Playwright v1.56 shipped with Test Agents — an AI-powered planner, generator and healer that can write and fix tests for you — I wanted to try it immediately. The problem? Like any brand-new feature, the documentation was thin and the tutorials hadn’t caught up yet. So I did what I increasingly do when faced with unfamiliar technology: I asked an AI to help me explore it.
This post walks through the entire journey, from crafting the initial prompt in Grok to watching Playwright’s agents plan, generate and heal a full test suite — and what I learned about using AI as a learning accelerator along the way.
The Starting Point: Using Grok to Build the Prompt
I knew roughly what I wanted — a self-contained demo that would exercise all three Playwright agents against a simple application. But I wasn’t sure of the exact setup steps, the agent initialisation commands, or the right prompt structure to hand to Claude Code.
Rather than spending an hour reading scattered docs, I opened Grok and typed:
Generate a prompt for Claude Code to demonstrate Playwright’s AI code generation and test case healing features by creating a test application and also set up the Playwright Test Agents (planner, generator and healer) to test the application.
Grok returned a detailed, battle-tested prompt (you can see the full output here) that specified:
- A vanilla HTML/CSS/JS Todo app as the test target
- The exact project structure matching Playwright’s agent layout
- Step-by-step setup commands including
npx playwright init-agents --loop=claude - Example prompts for each agent (planner, generator, healer)
- A healing demonstration section showing how to intentionally break and repair tests
This is a pattern I’ve found invaluable: use one AI to write the prompt for another. Grok’s understanding of Playwright’s latest features meant the resulting prompt was far more comprehensive than anything I’d have written from scratch. It included details I didn’t yet know I needed — like the --loop=claude flag and the .claude/agents/ directory structure.
What AI Built: The Test Application
I pasted Grok’s prompt into VS Code with Roo Code (Claude), and within minutes had a complete project. The application under test is a clean Todo List app with all the features you’d expect:
 The Todo app in its empty state: input field, filter buttons (All/Active/Completed), and item counter.
 After adding and completing a todo — notice the “Clear Completed” button appears automatically.
The app supports adding todos, toggling completion, deleting items, filtering by status, clearing completed items, and persisting everything to localStorage. It’s intentionally simple — the point isn’t the application, it’s what the agents do with it.
The full project is available on GitHub.
Agent 1: The Planner — Exploring the App and Writing a Test Plan
With the app running on http://localhost:4000, I invoked the planner agent:
@planner Explore the Todo app at http://localhost:4000 and create a comprehensive
test plan. Examine all features: adding todos, toggling completion, deleting items,
filtering (All/Active/Completed), clearing completed, and localStorage persistence.
Save the plan to specs/todos.md
What Happened Behind the Scenes
The planner doesn’t just read the HTML source. It uses MCP (Model Context Protocol) tools to:
- Navigate to the app in a real browser
- Take accessibility snapshots of the page
- Identify interactive elements — buttons, inputs, checkboxes, their roles and labels
- Map out user flows and edge cases
- Output a structured Markdown test plan
The resulting specs/todos.md contained 17 well-structured scenarios covering:
- Scenarios 1–2: Adding single and multiple todos
- Scenarios 3–4: Toggling completion on and off
- Scenario 5: Deleting a todo
- Scenarios 6–7: Clearing completed and button visibility
- Scenarios 8–11: All three filter states plus count verification
- Scenarios 12–13:
localStoragepersistence and reload behaviour - Scenarios 14–17: Edge cases — empty input, whitespace, special characters, large volumes
Each scenario included clear steps and expected outcomes. The planner identified things I might have missed in a manual plan — like verifying that the item count stays correct regardless of the active filter, or that whitespace-only input is rejected.
Agent 2: The Generator — Turning the Plan into Tests
Next, I invoked the generator:
@generator Read the test plan at specs/todos.md and generate Playwright test files
for all scenarios. Use role-based locators, proper assertions, and follow Playwright
best practices. Output the tests to the tests/ directory.
What It Produced
The generator read every scenario from the Markdown plan and created six test files:
| File | Scenarios Covered |
|---|---|
add-todo.spec.ts | Adding single and multiple todos |
toggle-todo.spec.ts | Toggling complete/incomplete |
delete-todo.spec.ts | Deleting items |
filter-todo.spec.ts | All/Active/Completed filters, count verification |
persistence.spec.ts | localStorage save and reload |
edge-cases.spec.ts | Empty input, whitespace, special characters, 50-item stress test |
The generated code followed Playwright best practices throughout:
- Role-based locators (
getByRole,getByPlaceholder,getByText) rather than fragile CSS selectors - Proper
beforeEachhooks clearinglocalStorageand reloading to ensure test isolation - Semantic assertions (
toHaveCount,toBeVisible,toHaveAttribute)
Here’s an example of the generated test for adding a todo:
import { test, expect } from "@playwright/test";

test.beforeEach(async ({ page }) => {
  await page.goto("/");
  await page.evaluate(() => localStorage.clear());
  await page.reload();
});

test("should add a new todo", async ({ page }) => {
  await page.getByPlaceholder("What needs to be done?").fill("Buy groceries");
  await page.getByRole("button", { name: "Add todo" }).click();

  await expect(page.getByRole("listitem")).toHaveCount(1);
  await expect(page.getByText("Buy groceries")).toBeVisible();
  await expect(page.getByText("1 item left")).toBeVisible();
});
Clean, readable, and immediately runnable. The generator produced 63 test cases in total (21 scenarios × 3 browsers: Chromium, Firefox and WebKit).
The First Run: 57 Passed, 6 Failed
Running npx playwright test produced a mix of green and red:
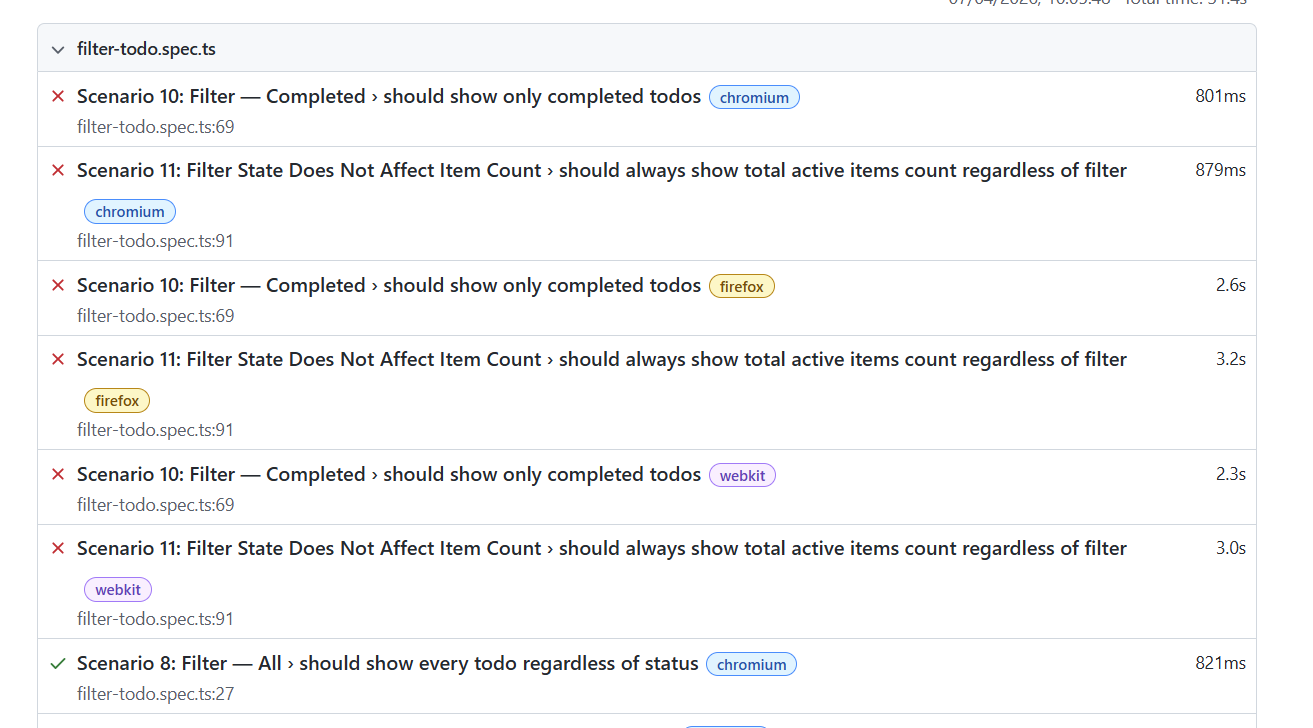 Scenarios 10 and 11 failed across Chromium, Firefox and WebKit — 6 failures from 63 tests.
The failures were all in filter-todo.spec.ts, specifically Scenario 10 (Filter — Completed) and Scenario 11 (Filter State Does Not Affect Item Count). Every browser hit the same error.
Diagnosing the Error
Looking at the Playwright HTML report, the error was immediately clear:
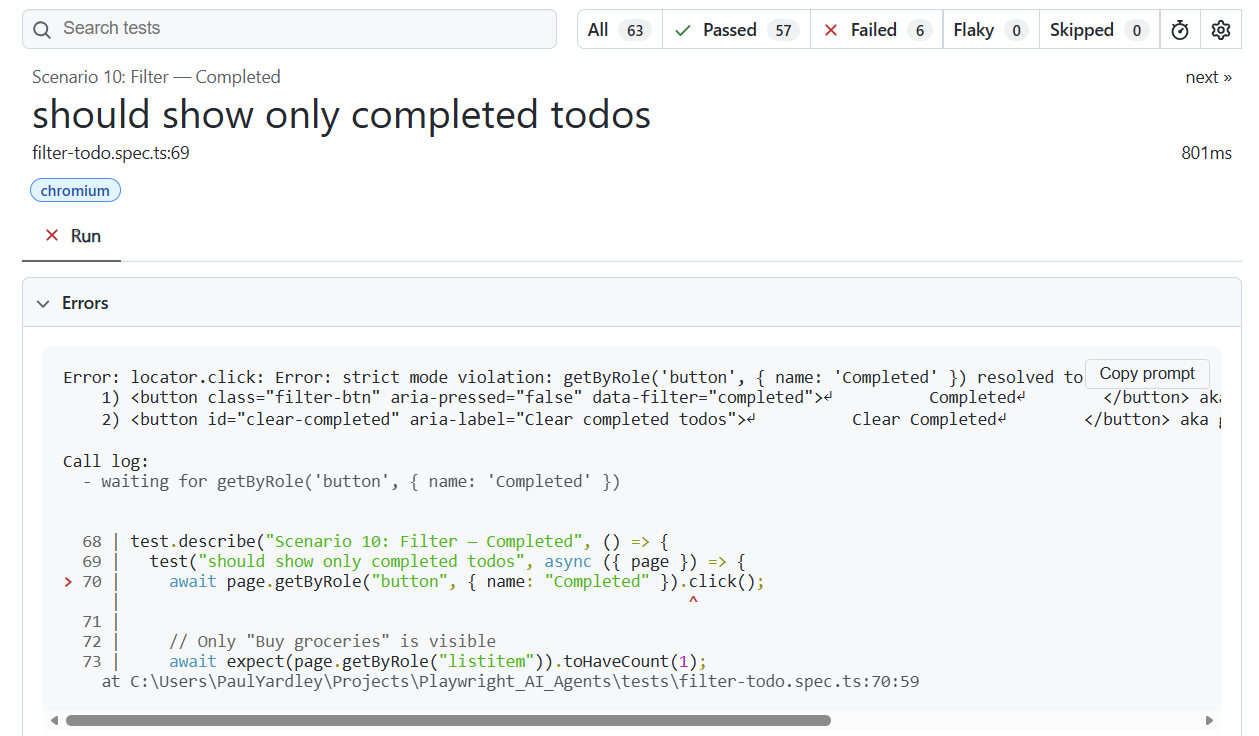 The “Completed” button locator matched two elements on the page.
The error message reads:
Error: locator.click: Error: strict mode violation:
  getByRole('button', { name: 'Completed' }) resolved to 2 elements:
    1) button class="filter-btn" data-filter="completed" — Completed
    2) button id="clear-completed" aria-label="Clear completed todos" — Clear Completed
The locator for the “Completed” button was matching both the “Completed” filter button and the “Clear Completed” button — because “Clear Completed” contains the substring “Completed”. Playwright’s strict mode (rightly) threw an error rather than clicking an ambiguous element.
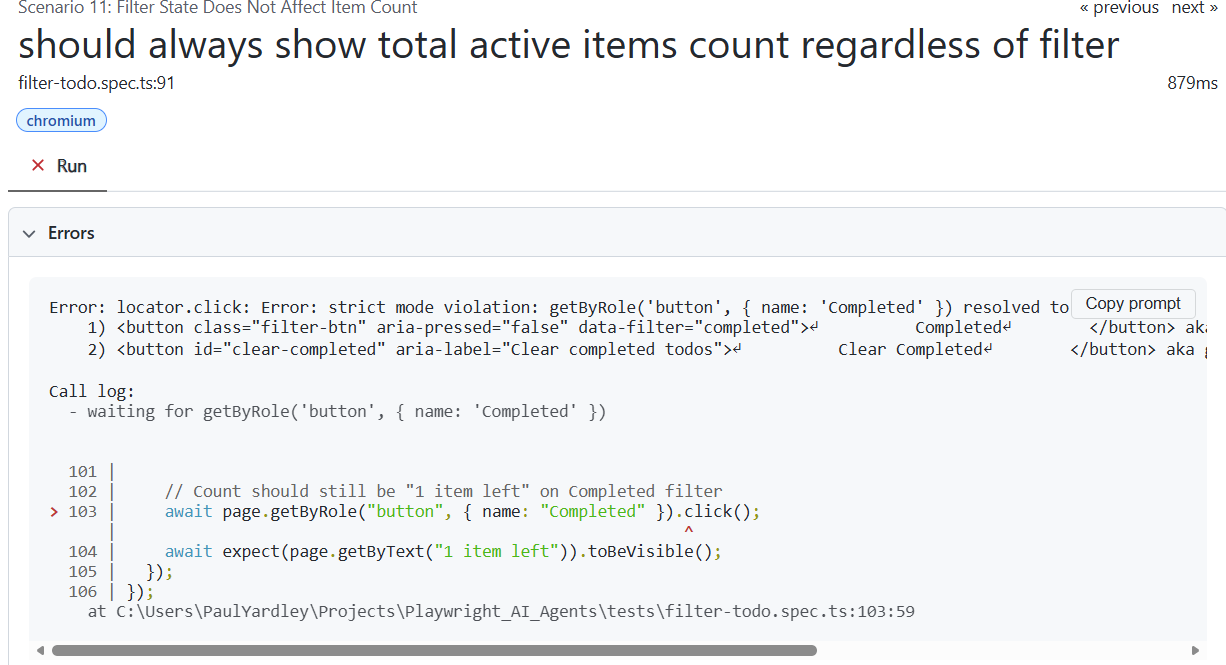 Scenario 11 hit the same ambiguity on line 103.
Agent 3: The Healer — Diagnosing and Fixing
This is where the healer agent earns its keep. I prompted it with the failing test:
@healer The test "Scenario 10: Filter — Completed > should show only completed
todos" in tests/filter-todo.spec.ts is failing. Replay the failing test, inspect
the current UI state, identify the issue, and fix the test code.
What the Healer Did
- Replayed the failing test steps against the live app
- Inspected the DOM and accessibility tree via MCP
- Identified the root cause: the “Completed” button locator was ambiguous, matching both the filter button and the “Clear Completed” button
- Applied the fix: added
exact: trueto the locator on lines 70 and 84 - Re-ran the test to verify
The fix was surgical — changing:
// Before (ambiguous — matches "Completed" AND "Clear Completed")
await page.getByRole("button", { name: "Completed" }).click();
to:
// After (exact match — only the filter button)
await page.getByRole("button", { name: "Completed", exact: true }).click();
The same fix was applied to Scenario 11 on line 103. After healing, all 63 tests passed:
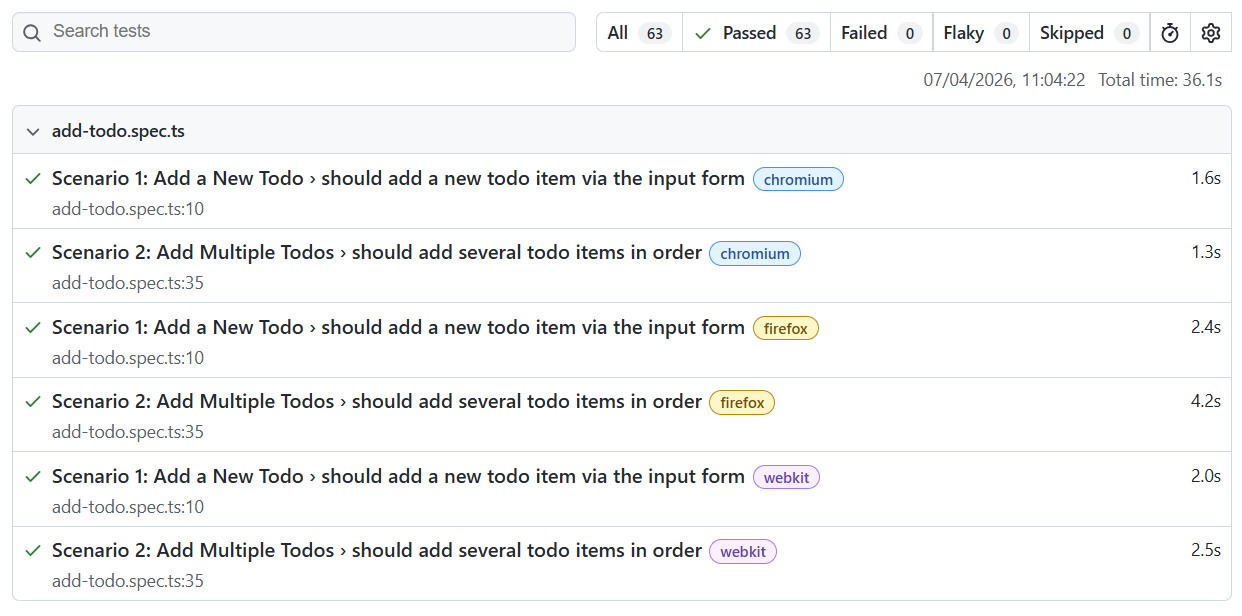 All 63 tests green — 63 passed, 0 failed, 0 flaky. Total time: 36.1 seconds.
The Bigger Picture: AI as a Learning Accelerator
The technical outcome — a working test suite with self-healing capabilities — is useful, but the more interesting takeaway is the process.
Using AI to explore unfamiliar technology
When Playwright’s Test Agents were brand new, there were no blog posts, no Stack Overflow answers, no YouTube tutorials. The traditional approach would have been:
- Read the sparse official docs
- Try things, fail, Google the error
- Piece together a working setup over several hours
- Write tests manually, debug them manually
Instead, the AI-assisted approach was:
- Ask Grok to generate a comprehensive prompt (5 minutes)
- Feed the prompt to Claude and get a complete project scaffold (10 minutes)
- Run the agents and observe how they work (15 minutes)
- Learn from what the AI produced — the code, the patterns, the edge cases it found
The entire exploration took under an hour. More importantly, I didn’t just get a working demo — I understood how the agents work, because I could see exactly what each one did at every step.
The “prompt for a prompt” pattern
Using Grok to write the prompt for Claude is a technique worth highlighting. Each AI has different strengths:
- Grok had up-to-date knowledge of Playwright v1.56’s agent features and could structure a comprehensive, actionable prompt
- Claude (via Roo Code) excelled at executing that prompt — scaffolding the project, writing the application code, and interacting with the Playwright agents
This isn’t about one AI being better than another. It’s about using the right tool for each step. Grok was my research assistant; Claude was my implementation partner.
What this means for QA engineers
Playwright’s Test Agents represent a genuine shift in how we can approach test automation:
- The planner can explore an application and produce a test plan that a junior engineer might take half a day to write
- The generator turns that plan into idiomatic, best-practice test code in seconds
- The healer diagnoses and fixes failures that would normally require manual debugging
None of these replace human judgement — you still need to review the test plan, validate the generated code, and decide whether the healer’s fix is correct. But they dramatically reduce the time to first working test and lower the barrier to exploring new tools and frameworks.
Try It Yourself
The complete project is on GitHub: github.com/pyardley/Playwright_AI_Agents
To run it:
git clone https://github.com/pyardley/Playwright_AI_Agents.git
cd Playwright_AI_Agents
npm install
npx playwright install
npx playwright init-agents --loop=claude
npm run dev:app    # Start the Todo app on localhost:4000
npx playwright test # Run the full suite
Then open your AI coding assistant and try the agent prompts from the README — planner, generator, and healer. Break something in the app and watch the healer fix it. It’s the fastest way to understand what these agents can actually do.
Key Takeaways
- Use AI to explore AI — Grok helped me understand and structure a prompt for a technology I’d never used before
- The planner → generator → healer pipeline works — 63 tests across 3 browsers, generated from a Markdown plan, with self-healing when things go wrong
- AI-generated tests aren’t perfect — the generator produced a genuine bug (ambiguous locator), but the healer caught and fixed it
- The barrier to trying new tools is lower than ever — an hour of AI-assisted exploration replaced what would have been a day of manual setup and learning
- Review everything — AI accelerates the work, but human judgement decides whether the output is correct and complete