From Test Suite to Demo Video: Building a Demo Mode for Playwright BDD
A test suite that passes tells you the software works. It doesn’t tell a stakeholder what the software does, or show a reviewer how carefully the verification logic is structured. Raw test output (green ticks in a terminal or a Playwright HTML report) requires domain knowledge to interpret. A video recording of a headed browser run is closer, but without signposting it’s a sequence of typing and clicking with no context for where one scenario ends and the next begins.
I wanted to run the same BDD tests I always run, but produce something presentable: a dark title card at the start of each scenario naming the feature and scenario, elements highlighted before interaction, and for Scenario Outlines, the exact input and expected values on screen so anyone watching knows what’s being tested. This is what building that demo mode looked like.
The Setup: A Dedicated Demo Project
Demo mode is opt-in. A dedicated Playwright project named demo is always registered in the config but only targeted when explicitly requested. It inherits standard Chrome settings and adds video recording, headed mode, and a 500ms slow-motion delay so interactions are legible on screen:
{
  name: "demo",
  use: {
    ...devices["Desktop Chrome"],
    headless: false,
    video: "on",
    launchOptions: { slowMo: 500 },
  },
},
Running a demo session is one command:
# PowerShell
$env:DEMO='true'; npx playwright test --project=demo features/contact.feature
# Bash / CI
DEMO=true npx playwright test --project=demo features/contact.featureThe DEMO=true environment variable controls the visual enhancements: title cards, highlights, and video organisation. The project name controls which browsers run. In practice they’re always set together, but separating them means the highlight() function can guard against running outside demo mode without coupling the check to a Playwright project name.
The reporter array picks up a custom DemoReporter alongside the standard HTML and list reporters:
reporter: [["html"], ["list"], ["./reporters/demo-reporter.ts"]],Part One: Title Cards Via DOM Overlay
The most immediately visible part of demo mode is the title card - a full-screen dark overlay that appears at the start of each scenario’s video, showing the feature and scenario names. The mechanism is straightforward: Playwright’s video recorder captures whatever is rendered in the page viewport. Any DOM element you inject via page.evaluate() appears in the recording.
showChapterTitle() in steps/demo.ts creates a fixed-position div that covers the entire viewport:
await page.evaluate(
  ([f, s, fields]) => {
    const el = document.createElement("div");
    el.id = "__demo-chapter";
    el.style.cssText = [
      "position:fixed;top:0;left:0;width:100%;height:100%;",
      "background:#1a1a2e;color:#eee;z-index:2147483647;",
      "display:flex;flex-direction:column;align-items:center;justify-content:center;",
      "font-family:system-ui,sans-serif;text-align:center;padding:2rem;box-sizing:border-box;",
    ].join("");
    el.innerHTML = `
      <p style="font-size:1rem;opacity:.6;text-transform:uppercase;letter-spacing:.12em">Feature</p>
      <h1 style="font-size:2rem;margin:0 0 2.5rem;font-weight:600">${f as string}</h1>
      <p style="font-size:1rem;opacity:.6;text-transform:uppercase;letter-spacing:.12em">Scenario</p>
      <h2 style="font-size:1.4rem;margin:0;font-weight:400;opacity:.9">${s as string}</h2>
      ${fieldsHtml}
    `;
    document.body.appendChild(el);
  },
  [feature, scenario, escapedFields],
);
await page.waitForTimeout(2500);
await page.evaluate(() => document.getElementById("__demo-chapter")?.remove());
z-index: 2147483647 - the maximum 32-bit signed integer - ensures nothing from the application renders above the overlay. After 2.5 seconds the element is removed and the test continues normally. Because the overlay is attached to the page’s own DOM, it works on any application regardless of framework or routing behaviour.
The Auto-Use Fixture
The showChapterTitle() call lives inside a demoChapter fixture declared with { auto: true }. Auto-use fixtures run before every test without any step file needing to import or declare them meaning zero changes to step definitions, the title card just appears:
demoChapter: [
  async ({ page, $testInfo, _demoBddData }, use) => {
    if (process.env.DEMO === "true") {
      const { bddFileData, uri } = _demoBddData;
      const titlePath = $testInfo.titlePath;
      const feature = titlePath.length >= 2 ? titlePath[titlePath.length - 2] : "";
      const scenario = titlePath[titlePath.length - 1] ?? "";
      const isExample = /^Example\s*#?\d+$/i.test(scenario);
      const exampleFields = isExample
        ? extractExampleValues(bddFileData, $testInfo.line, uri)
        : [];
      await showChapterTitle(page as Page, feature, scenario, exampleFields);
    }
    await use();
  },
  { auto: true },
],
$testInfo.titlePath in playwright-bdd is the full test hierarchy as a string array. The last element is the scenario name (or "Example #N" for Scenario Outline rows); the second-to-last is the feature name. The isExample regex check identifies outline rows - only those receive the example field values on the card; regular scenarios show just feature and scenario name.
Part Two: Element Highlights
highlight() in steps/demo.ts adds a temporary CSS outline and glow to a locator before the surrounding code interacts with it:
const STYLES = {
  action: {
    outline: "3px solid #e63946",
    shadow: "0 0 0 6px rgba(230,57,70,.3)",
  },
  verify: {
    outline: "3px solid #2a9d8f",
    shadow: "0 0 0 6px rgba(42,157,143,.3)",
  },
};

export async function highlight(
  locator: Locator,
  page: Page,
  type: "action" | "verify" = "action",
  ms = 600,
): Promise<void> {
  if (process.env.DEMO !== "true") return;
  const { outline, shadow } = STYLES[type];
  await locator.evaluate(
    (el, styles) => {
      const e = el as HTMLElement;
      e.style.outline = styles.outline;
      e.style.boxShadow = styles.shadow;
      e.style.transition = "outline .1s, box-shadow .1s";
    },
    { outline, shadow },
  );
  await page.waitForTimeout(ms);
  await locator.evaluate((el) => {
    const e = el as HTMLElement;
    e.style.outline = "";
    e.style.boxShadow = "";
    e.style.transition = "";
  });
}
Two types serve different purposes:
- Action (red) - marks an element that is about to be interacted with: a field about to be filled, a button about to be clicked.
- Verify (teal) - marks an element that is about to be asserted: a field being checked for a validation message, a link being verified for its
href.
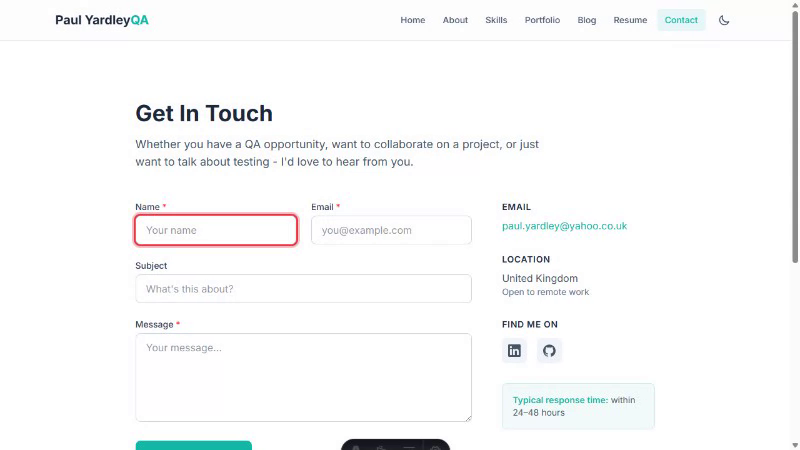 Red highlight on the Name field - the test is about to call
 fill() on this element.
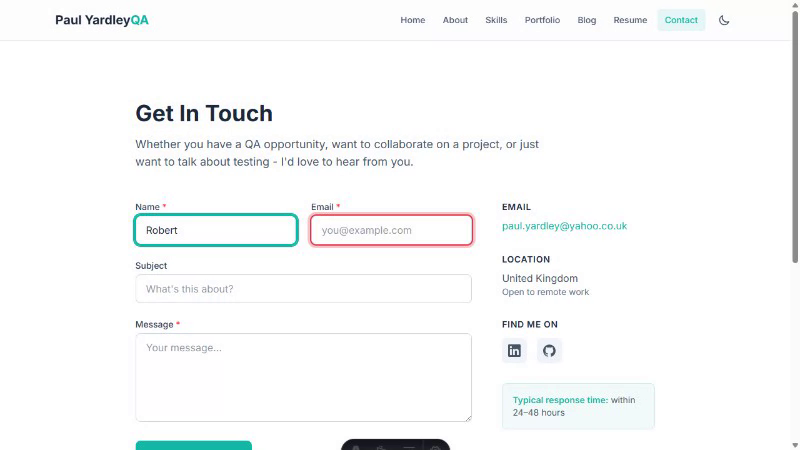 Red highlight on the Email field. The Name field already contains “Robert”, filled in the previous step.
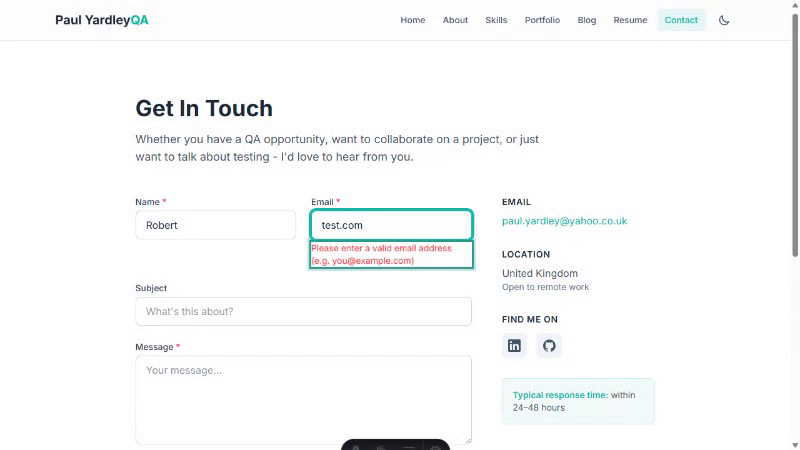 Teal highlight on the Email field during a Then step - the test is asserting the validation error text. The error is visible below the field.
The colour distinction tells a viewer exactly what the test is doing: red means “next action”, teal means “checking this”. The function is a no-op when DEMO !== "true" (early return on the first line), so calls can be added to all step definitions without affecting CI.
Usage in a When step:
When(
  "the user enters name {string} and email {string}",
  async ({ page, fieldContext }, name: string, email: string) => {
    const nameInput = page.getByLabel("Name");
    await highlight(nameInput, page); // red, 600ms
    await nameInput.fill(name);

    const emailInput = page.getByLabel("Email");
    await highlight(emailInput, page); // red, 600ms
    await emailInput.fill(email);
  },
);
And in a Then step:
Then(
  "error message {string} should be displayed",
  async ({ fieldContext, page }, expectedError: string) => {
    const { inputLocator, errorLocator } = fieldContext.value;
    await highlight(errorLocator, page, "verify"); // teal, 600ms
    await expect(errorLocator).toHaveText(expectedError);
  },
);
The 600ms pause is visible at 1× playback speed but doesn’t drag out an already slowed-down run excessively. Combined with the 500ms slowMo already set on the project, each interaction is given about a second of clear visual treatment before the action fires.
Part Three: Named Example Values on the Title Card
This was the most technically involved part of the build. For Scenario Outlines, the title card initially showed raw quoted values separated by dots - "Paul" · "" · "^(?:Please )?[Ff]ill (?:in|out) this field\.?$". That communicates the values but not which field has which value.
What a viewer needs to read is:
name = "Paul"
email = ""
error = "^(?:Please )?[Ff]ill (?:in|out) this field\.?$"
Getting there required two pieces of data available in different places: the parameter values (provided by playwright-bdd at runtime) and the column names from the Gherkin Examples table (which live in the feature file on disk).
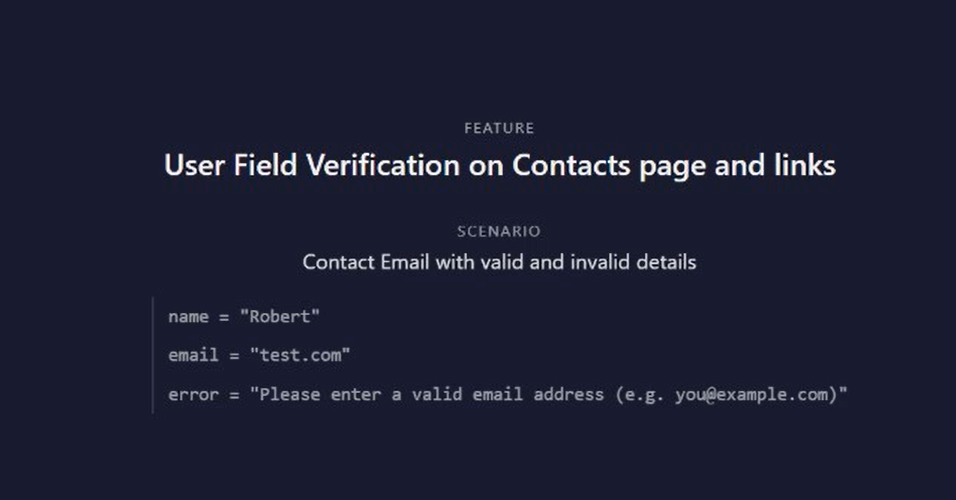 Title card for a Scenario Outline row - the feature name, scenario name, and all example values with their column headers are visible before the test begins.
![Title card showing Example #1 with a regex pattern as the error value: error = "^(?:Please )?[Ff]ill (?:in|out) this field.?$"](/blog/demo-mode/title-card-regex-error.png) Example #1 uses a regex pattern as the expected error. The column names make the card readable even when the values are dense.
Example #1 uses a regex pattern as the expected error. The column names make the card readable even when the values are dense.
Accessing playwright-bdd’s Internal Fixture
playwright-bdd injects a $bddFileData fixture into every generated spec. It’s an array of objects, one per test in the file, each containing the test’s step data and matched parameter values from the Gherkin step text:
{
  "pwTestLine": 58,
  "pickleLine": 32,
  "steps": [
    {
      "keywordType": "Action",
      "isBg": false,
      "textWithKeyword": "When the user enters name \"Paul\" and email \"\"",
      "stepMatchArguments": [
        { "group": { "value": "\"Paul\"" }, "parameterTypeName": "string" },
        { "group": { "value": "\"\"" }, "parameterTypeName": "string" }
      ]
    },
    {
      "keywordType": "Outcome",
      "isBg": false,
      "textWithKeyword": "Then error message \"^(?:Please )?...\" should be displayed",
      "stepMatchArguments": [
        {
          "group": {
            "value": "\"^(?:Please )?[Ff]ill (?:in|out) this field\\.?$\""
          }
        }
      ]
    }
  ]
}
The important fields are pwTestLine (for matching the current test), pickleLine (the feature file line of this example row - the key to finding the column headers), and stepMatchArguments[].group.value (the full quoted parameter string as it appeared in the step).
$bddFileData is an internal fixture, not part of playwright-bdd’s public API, and TypeScript has no type for it. Referencing it directly in a typed fixture declaration causes a type error. The solution is a bridge fixture that captures it with a contained any cast and re-exposes it as unknown[]:
_demoBddData: async ({ $bddFileData, $uri }: any, use) => {
  await use({
    bddFileData: Array.isArray($bddFileData) ? ($bddFileData as unknown[]) : [],
    uri: typeof $uri === "string" ? $uri : "",
  });
},
$uri - also injected by playwright-bdd - is the feature file path relative to the project root (e.g. features\contact.feature). Both are captured together in the same bridge since both are any-cast in isolation.
Reading Column Headers from the Feature File
The Gherkin pickleLine is the line number in the feature file where this example row appears. The Examples table structure is always:
Examples:
  | col1 | col2 | col3 |      ← header row (pickleLine of first data row minus 1)
  | val1 | val2 | val3 |      ← pickleLine = this line number for the first example
  | val4 | val5 | val6 |      ← pickleLine for the second example
Scanning backwards from the data row until a line starting with examples is found gives the header row at i + 1:
function getExampleHeaders(uri: string, pickleLine: number): string[] {
  try {
    const featurePath = path.resolve(process.cwd(), uri);
    const lines = fs.readFileSync(featurePath, "utf-8").split("\n");
    // Start above the data row (pickleLine is 1-indexed)
    for (let i = pickleLine - 2; i >= 0; i--) {
      if (lines[i].trim().toLowerCase().startsWith("examples")) {
        return (lines[i + 1] ?? "")
          .split("|")
          .slice(1, -1)
          .map((cell) => cell.trim())
          .filter(Boolean);
      }
    }
  } catch {
    /* file unreadable - return empty */
  }
  return [];
}
The scan handles any table depth - whether the current example row is the first or the tenth, the backwards walk reliably terminates at the nearest Examples: keyword above it. Tagged Examples blocks (@tag\nExamples:) work correctly because the tag line is skipped during the scan.
The headers are paired with parameter values collected from all non-background steps in the test:
const values: string[] = [];
for (const step of testData.steps) {
  if (step.isBg) continue; // skip Background steps
  for (const arg of step.stepMatchArguments ?? []) {
    values.push(arg.group?.value ?? '""');
  }
}
return headers.map((label, i) => ({ label, value: values[i] ?? '""' }));
An earlier version of this code filtered to keywordType === "Action" steps only. That excluded the Then step’s parameter - the expected error - which is exactly the value that makes the most sense to show on the card. Removing the keyword filter and iterating all non-background steps in order collects every parameter in the sequence they appear in the Examples table columns.
HTML Escaping
The title card renders as browser DOM. Values like "^(?:Please )?[Ff]ill (?:in|out) this field\.?$" contain regex metacharacters that are harmless in HTML text content, but some values could plausibly contain < or > characters - subject lines with angle brackets, for instance. HTML escaping happens in Node.js before the values are passed to page.evaluate(), keeping the evaluate callback free of escaping logic:
const escHtml = (s: string) =>
s.replace(/&/g, "&").replace(/</g, "<").replace(/>/g, ">");
const escapedFields = exampleFields.map((f) => ({
label: escHtml(f.label),
value: escHtml(f.value),
}));Part Four: Organising the Video Output
Playwright names test output directories using a hash derived from the full test title. By default, a contact form scenario might land in a folder called contact-feature-spec-js-Contact-Email-w-f3a8/. That’s fine for debugging; it’s unhelpful for a library of demo videos.
reporters/demo-reporter.ts implements Playwright’s Reporter interface. The onTestEnd hook fires after the video file is finalised - the only safe moment to rename the directory containing it:
export default class DemoReporter implements Reporter {
  onTestEnd(test: TestCase, result: TestResult): void {
    if (process.env.DEMO !== "true") return;
    const videoAttachment = result.attachments.find((a) => a.name === "video");
    if (!videoAttachment?.path) return;

    const titlePath = test.titlePath();
    const featureName = path
      .basename(test.location.file)
      .replace(/\.feature\.spec\.js$/, "");
    const exampleTitle = titlePath[titlePath.length - 1] ?? "";
    const scenario = sanitize(titlePath[titlePath.length - 2] ?? "").slice(
      0,
      55,
    );
    const project = test.parent.project()?.name ?? "demo";
    const isScenarioOutline = /^Example\s*#?\d+$/i.test(exampleTitle);
    // ...
  }
}
For Scenario Outlines, all example videos are moved into a single shared folder named after the scenario, each renamed Example-N.webm:
test-results/
└── contact-Contact-Email-with-valid-and-invalid-details-demo/
    ├── Example-1.webm
    ├── Example-2.webm
    ├── Example-3.webm
    ├── Example-4.webm
    ├── Example-5.webm
    └── Example-6.webm
For regular scenarios, each gets its own folder:
test-results/
└── contact-User-Field-Verification-on-Contacts-page-and-links-demo/
    └── video.webm
The sanitize() helper replaces non-alphanumeric characters with hyphens and collapses whitespace. Scenario names are capped at 55 characters to avoid path length issues on Windows.
One implementation detail: the reporter renames currentDir (the directory containing video.webm) rather than the video file itself. For Scenario Outline rows, it creates the shared scenario directory first, moves the video into it with the Example-N.webm name, then removes the now-empty original directory.
Challenges Along the Way
Stale Generated Specs After Adding Fixtures to Steps
playwright-bdd generates JavaScript spec files from .feature files via npx bddgen. These generated specs include the fixture list for each step, derived from the fixtures the step function destructures in its first argument. When I added page to Then step fixture signatures - to enable highlight calls - the generated specs still had the old list. The tests ran with the stale spec, page was never injected, and highlight() called page.waitForTimeout() on an undefined value.
The failure looked like a runtime error in the highlight code: TypeError: Cannot read properties of undefined (reading 'waitForTimeout'). Nothing in the error pointed to a code generation problem. After confirming the step code was correct, the fix was npx bddgen to regenerate the specs. The lesson: any time a step function’s fixture list changes, run bddgen before running the tests.
TypeScript and playwright-bdd’s Internal Fixtures
$bddFileData and $uri are declared internally by playwright-bdd using { scope: 'test', box: true }. “Box” fixtures don’t extend the public TestFixtures type, so TypeScript has no awareness of them. Referencing either directly in a typed fixture declaration produces a compile error.
The bridge fixture pattern - one fixture that does the any cast in isolation and immediately re-types - contains the escape hatch in a single place. Everything downstream stays strictly typed. The eslint-disable-next-line @typescript-eslint/no-explicit-any comment marks the intentional boundary.
onTestEnd Timing for Video Rename
An earlier approach attempted to rename directories inside a test afterEach hook. This failed intermittently because Playwright’s video finalisation happens asynchronously after the test completes - the video file may still be open when afterEach runs. The Reporter.onTestEnd() callback is the contractually correct place: by the time it fires, the result attachments array is populated with the final video path, meaning the file is closed and safe to move.
Key Takeaways
DOM overlays injected via page.evaluate() appear in Playwright’s video recordings. The recorder captures the viewport contents, not just the application’s own rendering. A full-screen fixed-position div is enough to produce a clean title card in the video with no external tooling. The z-index: 2147483647 ceiling ensures nothing from the application renders over it.
Auto-use fixtures are the right place for cross-cutting concerns. The title card appears in every scenario without any step file touching it. Adding { auto: true } to a fixture is the Playwright way to express “run this before every test” - cleaner than beforeEach hooks that require knowing which describe blocks to apply them to.
playwright-bdd’s $bddFileData exposes compiled Gherkin step data at runtime. It contains enough information - step keyword types, match arguments, pickleLine, background flags - to reconstruct what the current test is doing, including which Scenario Outline row is executing. The bridge fixture pattern keeps this accessible without weakening the overall type system.
For column names, read the feature file directly. Examples table column headers are not included in $bddFileData. The pickleLine field gives you a precise anchor into the feature file, and the header row is always exactly one line below the nearest Examples: keyword above it. A backwards scan is simple and handles any table size.
Run npx bddgen any time a step’s fixture list changes. Adding or removing a fixture from a step function’s destructuring requires regenerating the spec files. The failure mode - a fixture is undefined at runtime - doesn’t point directly at bddgen and can be mistaken for a code bug.
Reporter.onTestEnd is the correct hook for post-video operations. Video finalisation is asynchronous; trying to rename directories in afterEach creates a race. By onTestEnd, the video attachment is in the result and the file is closed.
The Code
The full test suite is on GitHub: github.com/pyardley/playwright-bdd-suite
Relevant files for the demo mode:
steps/demo.ts-showChapterTitle(),highlight(),extractExampleValues(), and the feature file header parsersteps/fixtures.ts- thedemoChapterauto-use fixture and the_demoBddDatabridgereporters/demo-reporter.ts- the custom reporter that organises video output after each testplaywright.config.ts- thedemoproject and reporter registration